Friday, February 8, 2013

airtel internet trick APRIL 2013

Airtel Real Host Trick - Working

Dear visitors today I Have new Airtel real host trick which can be used in moble. As many airtel vpn tricks are blocked in many states, for those who cannot use vpn tricks they can use this real host trick.

This new Airtel tricks is confirmed to be woking in Delhi & Tamil Nadu however you can try this trick in your State and if it's working comment below.

Steps To Use Airtel Real Host Trick

Here are very simple steps to use this trick, first you need to download any opera or uc handler you can google it or download link is below
Creat new config in mobile:

Account Name: AIRTEL
Access point: airtelgprs.com
Proxy:- proxy.dreamvpn.us or 199.115.229.205

Port: 80
Now Save the Settings, Open Opera min in handler,
In Opera Mini handler, Enter the below FrontQuery exact as shown below.

FrontQuery:     working hp/action.php/Cousm/http/
Replace working hp with any working homepage of your states. Below are few homepages you can use.
Working Homepages:
202.46.201.112
203.115.112.5
203.115.112.27
203.115.112.27
122.170.122.201
122.170.122.212
122.170.122.202
122.170.122.214

Note: As this Trick is based on Proxies to avoid sim blocking don't use more than 50mb in once. After use of 45-46 mb disconnect it and then reconnect. There will be no sim blocking.

Share this post with your friends if you like it.

Thursday, February 7, 2013

HOW TO INCREASE RAM MEMORY


               INCREASING RAM memory using PENDRIVE


Hi friends, Windows 7 and Windows vista comes with a ready boost option. Q-What is ready boost

Ans- "ReadyBoost is a disk cache component of Microsoft Windows, first introduced with Microsoft'sWindows Vista in 2006 and bundled with Windows 7 in 2009. It works by using flash memory, a USB flash drive,SD card, CompactFlash, external hard drive


 or any kind of portable flash mass storage system as a cache. ReadyBoost is also used to facilitate SuperFetch, which allows it to perform analysis of boot-time disk usage patterns and creates a cache which is used in subsequent system boots." Source
If you are using a high configuration PC, It doesn't show any effect on speed because if you are a normal user I think only a few times you use your full ram memory but if you are using an old pc with low ram memory(Like 512 MB or IGB) and harddisk & using vista or 7. It speed up your PC and you will see the result, reduced application data loading time, reduced shutdown and restart time and many more you can't imagine without High ram memory. How to use this feature

Plug in your pendrive-> Format with NTFS or FAT32

Now go to properties->Select ReadyBoost

Check Use this device->Choose maximum space to reserve system speed

Click on Apply and OK. Your readyboost PenDrive is ready Now to Use.

Here is an personal suggestion HP and Sandisk is the Best for this work so what are you waiting for.

Enjoy Guys! and don't forget to post your comments.

How to Remove BIOS password

Reset BIOS PASSWORD by CMOS battery

The simplest way to remove a BIOS password is to simply remove the CMOS battery. A computer will remember its settings and keep the time even when it is turned off and unplugged because these parts are powered by small battery inside the computer called a CMOS battery. If we pull out this battery, the computer will forget alot of its hardware settings, including its BIOS password. This should not be performed on Laptops if you are not experienced working with laptop hardware.

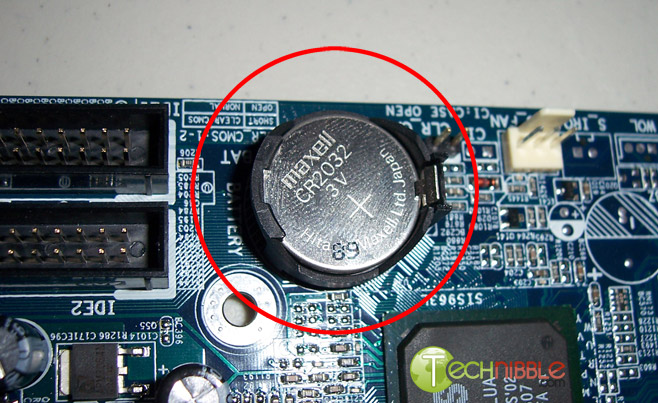
Finding the CMOS BatteryAnyway, open up the computer case using a screw driver and locate the flat, circular and metallic CMOS battery. It should look something like the picture to the right. Some computers have this part standing upright.
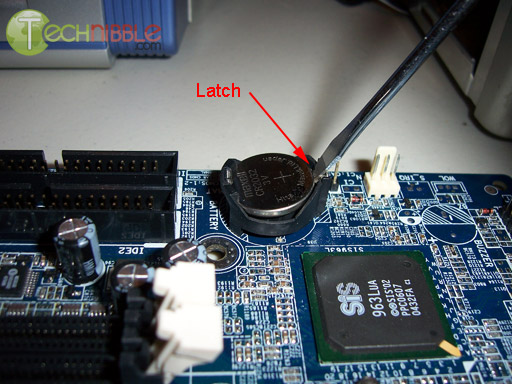
Once you have located it, observe how the latches are holding it. There are many different ways to remove a CMOS battery but the most common way on newer computers can be seen in the picture below.
Removing the CMOS Battery
Make sure to power down the computer, unplug the power cables and unplug any USB devices if they are powered. The computer must not be able to get power from anywhere for this to work. Take out the CMOS battery and wait 10 – 25 minutes before putting it back in. The reason for this wait is because the computer can still store power in its capacitors even though everything is unplugged. The waiting period allows enough time for them to discharge.
Plug everything back in, power up the computer and enter the BIOS again. If everything went well there should be no more password. In some cases, if you get weird error messages during bootup now, you will need to goto “Load BIOS Defaults” in BIOS and save the changes to fix them.
If this method didn’t work, try one of the methods below.

 Reset Password using pc cmos cleaner

PC CMOS Cleaner  is an easy-to-use tool to recover, delete, decode and display the superior passwords stored in BIOS whatever the brand is. Most types of BIOS are supported. It's an bootable CD that runs on x86 and x86_64 computers. No need to pay expensive fees to experts. It's a useful tool for users to get their lost BIOS password back, or clean passwords from an old computer bought from others.


Minimum Requirements:


  • PC 586 or higher, 64 MB RAM
  • Keyboard: Standard, PS/2 or USB (HID)
  • Mouse (optional): serial, PS/2 or USB (HID)
  • Bootable CD/DVD drive 

All you should do:

  1. Download ISO files.
  2. Burn the ISO file to CD (see Burn CD).
  3. Set the BIOS to boot from CD. (see Set BIOS)
  4. Insert the CD you burned and reboot your computer. The software then automatically runs.
  5. Use PC CMOS Cleaner to finish the job. (see User-Guide of PC CMOS Cleaner)

This software is without any warranty. Please take your own risk. 

The Downloading Link is here   


How to Hide Drives and Partitions

Do you have data on a partition or hard drive that you don't want tampered with or easily accessible to other users? Well, you can hide any drive/partition in Windows XP, NT, and 2000. That means that they won't show up in Explorer or My Computer.

If you want access to that drive from your user account you should create a desktop shortcut before proceeding. Once hidden, you can still access by typing the drive letter and a colon in Start/Run—for example, "D:" will bring up a folder of the contents on your D drive.

The easiest way with Win XP is to use the TweakUI power toy from Mcft. Go to Start/Run and type in "tweakui" (without the quotes).

Go to My Computer/Drives and uncheck the drive/partition(s) you want hidden. Click "Apply" or "OK" when finished.

If you have XP but not Tweak UI you can download it here...
http://www.Mcft.com/windowsxp/downloads/powertoys/xppowertoys.mspx

For Win NT, 2000, and XP you can use the following Registry edit:

*Be sure to back up the Registry before proceeding
http://www.worldstart.com/tips/tips.php/401

Open the Registry Editor by going to Start/Run and typing in "regedit" (without the quotes). Find your way to...

HKEY_CURRENT_USER\Software\Mcft\Windows\CurrentVersion\Policies

Click on "Explorer".

Double-click the "NoDrives" key in the right column. If you don't find a "NoDrives" registry key, just right-click in the right pane and choose "New/DWORD Value" then name the key "NoDrives".

You'll see a value like "0000 00 00 00 00". This is where the fun starts. The four sets of double zeros (after the "0000") are where you'll enter the values for the drive/partitions. Now, stay with me on this—it's not as complicated as it sounds:

The first column is for drives A-H, the second for I-P, the third for Q-X, and the fourth for Y-Z.

The values for each drive are as follows:

1 - A I Q Y
2 - B J R Z
4 - C K S
8 - D L T
16 - E M U
32 - F N V
64 - G O W
80 - H P X

So, let's say you want to hide drive D. In the first column you would put "08". For drive K you would put "04" in the second column.

But what if you want to hide more than one drive in a column? Simply add the values together: D+E = 8+16 = 24. So in the first column you would put "24".

Still baffled? If you have XP then go get TweakUI and save yourself the math.

Whichever method you use, you can rest easy knowing that the files on that drive or partition are less accessible to other users.

fast your firefox more....

firefox is already pretty damn fast but did you know that you can tweak it and improve the speed even more?

That's the beauty of this program being open source.
Here's what you do:
In the URL bar, type “about:config” and press enter. This will bring up the configuration “menu” where you can change the parameters of Firefox.

Note that these are what I’ve found to REALLY speed up my Firefox significantly - and these settings seem to be common among everybody else as well. But these settings are optimized for broadband connections - I mean with as much concurrent requests we’re going to open up with pipelining… lol… you’d better have a big connection.

Double Click on the following settins and put in the numbers below - for the true / false booleans - they’ll change when you double click.

Code:
browser.tabs.showSingleWindowModePrefs – true
network.http.max-connections – 48
network.http.max-connections-per-server – 16
network.http.max-persistent-connections-per-proxy – 8
network.http.max-persistent-connections-per-server – 4
network.http.pipelining – true
network.http.pipelining.maxrequests – 100
network.http.proxy.pipelining – true
network.http.request.timeout – 300


One more thing… Right-click somewhere on that screen and add a NEW -> Integer. Name it “nglayout.initialpaint.delay” and set its value to “0”. This value is the amount of time the browser waits before it acts on information it receives. Since you’re broadband - it shouldn’t have to wait.

Now you should notice you’re loading pages MUCH faster now!

How to lock Folder without any S/W

i found another trick to hide ur files and protect ur data . jsut follow some simple steps and you are done.

Open Notepad and copy the highlighted code and save as locker.bat(or any name with .bat extension). when you start it first time it will create a folder with Locker automatically for u. Don't forget to change your password in the code its shown the place where to type your password.
after creation of Locker folder again click on the locker.bat.it will ask.press Y then Locker folder will be disappeared.again to get it click on locker.bat. and give ur password u will get the folder again.
"keep your all private files in that locker folder"


****************************************

******************


cls

@ECHO OFF
title Folder Locker
if EXIST "Control Panel.{21EC2020-3AEA-1069-A2DD-08002B30309D}" goto UNLOCK
if NOT EXIST Locker goto MDLOCKER
:CONFIRM
echo Are you sure u want to Lock the folder(Y/N)
set/p "cho=>"
if %cho%==Y goto LOCK
if %cho%==y goto LOCK
if %cho%==n goto END
if %cho%==N goto END
echo Invalid choice.
goto CONFIRM
:LOCK
ren Locker "Control Panel.{21EC2020-3AEA-1069-A2DD-08002B30309D}"
attrib +h +s "Control Panel.{21EC2020-3AEA-1069-A2DD-08002B30309D}"
echo Folder locked
goto End
:UNLOCK
echo Enter password to Unlock folder
set/p "pass=>"
if NOT %pass%==karan goto FAIL
attrib -h -s "Control Panel.{21EC2020-3AEA-1069-A2DD-08002B30309D}"
ren "Control Panel.{21EC2020-3AEA-1069-A2DD-08002B30309D}" Locker
echo Folder Unlocked successfully
goto End
:FAIL
echo Invalid password
goto end
:MDLOCKER
md Locker
echo Locker created successfully
goto End
:End


in place of karan(which is your password here)you can give any password of your choice..from preventing ur this batch file from others you can change its icon so that no onw came to know that this is a folder locker file
To this right click on file>properties>customize and change icon. or you can hide this file also. its a great deal.

Enjoy with this guys .. nd please do comment on blogs u like so that i came to knw that there is need of writng all these ..

PLEASE BE A FOLLOWER IF YOU LIKE IT >>>

want to do something with registry files, have a look(How To Remove and Add Right-Click Menu Items from Files )

How To Remove and Add Right-Click Menu Items from Files and Fo
lders
Removing Items
A lot of programs you install will add themselves to the right-click menu of your files and/or folders. And most times, you have no choice in the matter and, as a result, your right-click menu can get very long with added items you don't even use. The last person I was helping with this had a right context menu so long that the Rename option was no longer visible!
Fortunately, you can easily remove those unwanted menu items, if you know the registry values to edit. And it's not at all difficult once you know the keys responsible for the additions.

For Files, the secret lies in the "context menu handlers" under the shellex subkey for "All Files" which, in the registry, is nothing but an asterisk - like a dos wildcard, which means the values entered apply to all files. It is at the very top of the Root key, right here:
HKEY_CLASSES_ROOT\*\shellex\ContextMenuHandlers

Click the the + sign next to the ContextMenuHandlers key, to expand it.
Now you will see some of the programs that have added items to your right-click menu. Simply delete the program keys you don't want.
Yup! It's that simple. If deleting makes you uneasy, just export the key before deleting it. Or, instead of deleting the values, disable them. Simply double click the default value for the program on the right hand pane and rename the clsid value by placing a period or dash in front of it.
ie; - {b5eedee0-c06e-11cf-8c56-444553540000}
Then exit the registry, refresh, and right click a file to see if the item was removed from the menu.
Some programs - like WinZip or WinRar - will add several items to your right click menu but all of them will be removed by deleting or disabling their one context menu handler.

Note that the above key only applies to the right click menu of files.
To remove entries from the right click context menu of folders, you need to navigate to the Folder and Drive keys:

HKEY_CLASSES_ROOT\Folder\shellex\ContextMenuHandlers
HKEY_CLASSES_ROOT\Drive\shellex\ContextMenuHandlers


All you have to do is follow the same procedure as for Files - either disable or delete items you wish to remove.
Adding Items
Adding Items to the right click menu of Files and Folders is also fairly simple using the Registry. It just involves the creation of a few new keys for each item you wish to add. You edit the same keys used for removing items. Let's use Notepad as an example of an item you'd like to add to the right click menu of all your files or folders.

For folders, go to this key:
HKEY_CLASSES_ROOT\Folder
Click the + sign next to Folder and expand it so that the Shell key is visible. Right click the Shell key and choose New>Key and name the key Notepad or whatever else you'd prefer (whatever the key is named is what will appear in the right-click menu). Now right click the new key you made and create another key named Command. Then, in the right hand pane, double click "Default" and enter Notepad.exe as the value.
Exit the registry, refresh, and right click any folder. Notepad should now be on the context menu.


For files, go here again:


HKEY_CLASSES_ROOT\*
Expand the * key and see if a Shell key exists. If it does exist, follow the same procedure as for folders. If it does not exist, you'll have to create a new Shell first. Just right click the * key and choose New>Key and name it Shell. Then right click the Shell key and continue on the same way you did for adding items to the right click menu of folders.
Once done, Notepad should appear as an option in the right click menu of all your files.

ENJOY WITH THIS TRICK GUYS .. HAVE FUN "Vishal"
COMMENT IF YOU LIKE
TELL YOUR FRIENDS BY SENDING LINK :vishalsharma999@blogspot.com

IF YOU HAVE ANY QUERY PLEASE ASK IN COMMENTS